Here is a write-up of how I made my Stephanie Brown Robin belt. You may have figured out some of this from my past posts, but here is all the detail.

I made the buckle and the dots on the belt using Sculpey clay. Sculpey III for the dots, and Sculpey Premo for the buckle. Premo is better for thinner shapes that might otherwise crack, since III is a little brittle.
I started out by dividing a block of Sculpey III into small sections (each block is formed by three logs, and I sectioned those logs into roughly three sections each).

Then I rolled each section into a ball, and pressed each into a 1 1/4 inch cabochon mold (specifically the Sculpey Cabochon Mold APM81).

I used an acrylic roller to smooth out the underside of the cabochon.

And carefully removed the cabochon from the mold.

I ended up making a lot of these dots (turned out I only needed 12 for my 27 inch belt, so I had extra).

I baked the dots on a toaster oven tray in my conventional oven. I find it’s good to cover the tray with foil to avoid the cooking clay smell and fumes. I cooked them for a little longer than recommended, just to make sure the clay was hardened.

Moving on to the buckle, I made this, as previously mentioned, using Sculpey Premo.

For the middle part, I followed the same method I used for the dots, but I used a larger mold (1 7/8 inches). This was the PJ003 mold from Best Flexible Molds.

For the base disk, I used a 2 1/2 inch flat circle mold from Mold Muse.

Here is the finished disk. I baked the Premo pieces in a similar manner to how I baked the Sculpey III dots. I did let them bake longer, though, because Premo takes more time to cook.

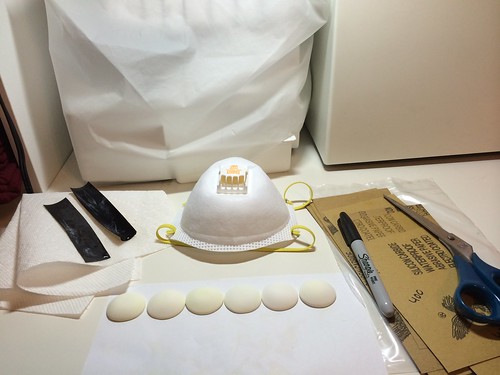
After the pieces were baked and cooled, I sanded them down. I used three grits of wet/dry sandpaper (400, 600, and 800) in progressive order to get a smoother finish. I wore a particle respirator mask and did the sanding in a bucket of water to avoid breathing in any polymer clay dust.
After that I applied a few layers of acrylic gesso to the sanded pieces, and then painted them with acrylic paint. I chose the yellow paint to match the fabric I was going to use for the belt itself.

Then I sewed a 1 1/2 x 26 1/2 inch tube of cotton sateen (plus seam allowances), encasing another layer of polar fleece (to give the belt some body). I made piping (using cotton 4.8mm cording that is often used for upholstery) and sewed it into the long edges of the tube (which I sewed wrong sides together first, and then turned). Turning the tube is hard to do with the piping, but a chopstick can help. After turning, I hand sewed the tube closed.

I glued the two parts of the buckle (the domed piece and the disk) together using hot glue. I used Gem-Tac glue to attach the dots and the buckle to the fabric belt.

I put a closure on the belt (a large snap) by sewing one part to the fabric end and gluing the other part to the belt. I used E6000 glue (always use proper ventilation–I open a window and wear a respirator when using E6000).

Finished!

To show scale:

